
How to shorten shoelaces or replace broken aglets

The tips of shoelaces are called aglets. If you crack your plastic aglets or need to shorten your shoelaces there are a few ways to fix them.
Here's one:
Materials:
-shoelaces that need to be altered
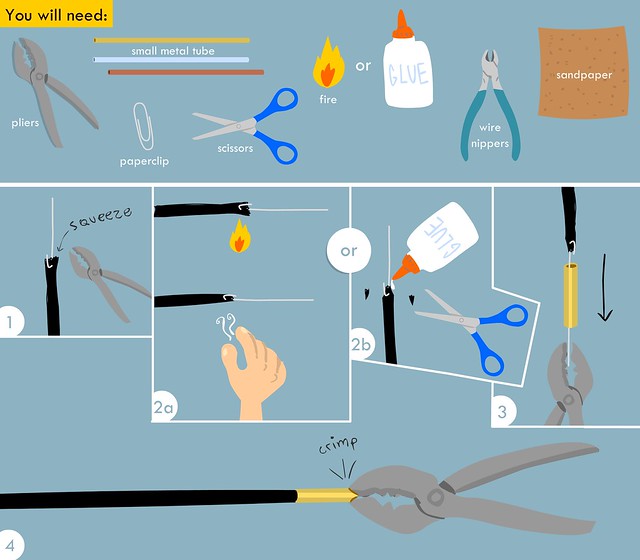
-pliers
-paperclip
-small metal tubing , easily available in brass, aluminum, and copper at craft-hobby-art supply stores. Make sure to get tubing that is smaller than your eyelet size. I used 1/8" brass from K & S Engineering for this project. I found it at a local Dick Blick but it is really easy to find online.
-scissors
-fire ~ lighter and/or glue
-wire nipper
-sandpaper
Instructions:
1. Unfurl the paper clip and turn it into a hook. Push the hook through the shoelace tip and use the pliers to squeeze the hook end for a good grip.
2a. If your shoelaces are made from a synthetic material you can use a lighter to heat up the tip of the shoelace and then use your fingers to taper the ends. Proceed to scream, "ouchy!" cause you just melted off your fingerprints. Don't worry, they will heal. ;)
2b. If you don't feel like burning off your fingerprints or are using a natural material, you can use a scissor to taper the end and add a dab of glue to smooth it tightly together.
3. Pull the hooked shoelace through the tube using pliers. A rotating motion works best.
4. Remove the hook after the lace is completely pulled through. You may need to use the wire nippers to cut it off. Cut or burn off any extra shoelace that is sticking out and crimp the ends with the pliers to secure.
Use sandpaper to smooth out any rough edges.
I used my pliers and wire nippers to cut down the tube, but there are better options. If you want a nice smooth cut, you can use a tube cutter designed for small tubing like this one , a saw, or rotary cutter.
Today I came across two neater ways to secure metal aglets, 1. by crimping it lengthwise or 2. driving a couple of small nails through it to make indentations. I found some photos of that process and other techniques, like heat shrink tubing, on Ian's Shoelace Site.
Antiquing the aglet
I wanted the aglet color to coordinate with the color of the eyelets (antique brass) so I attempted to age it with what I had on hand. I ended up using blue drawing ink and black and dark brown leather dye. I roughed up the tubing with sandpaper before rubbing on the antiquing concoction. My fingers are now a lovely shade of orangey-brown from not using any gloves (not recommended) but I'm pleasantly surprised with the results.
Let me know if you have any questions about this post!
![]()
![]()


2 Comments:
Ha! Thanks for commenting Dees! The hat is on the way Timmie!
Oh my gosh. I was just admiring my "I'm sorry to inform you that the milk is expired" postcard on my frigo this morning and now I learn the word Aglet! Thanks!
JCG
Post a Comment
<< Home